By Levi Sim – Owner/Photographer/ Public Speaker at Levi Sim Photography
Photo printing has become more valued than ever before. We are surrounded by digital imagery; it’s in front of us all the time, but we skip through Instagram quickly, rarely lingering in on a picture for more than a few seconds. Because of this when you hand a person a printed photograph—especially children— they instantly value it and enjoy it much longer than anything they see on screen.
Below you will find technical tips and ideas on how to adjust your camera settings to create the best photograph. You can practice these settings and make them a second nature allowing you to be free to create different print versions and translate the best results.
The difference between “technical photographers” and great photographers is that the great photographers have already mastered the techniques and can create a wide range of options.
With that, let me share some photo printing tips with lighting in mind. If you use these tips, you’ll find that your digital pictures will turn out better.

My passion for both hiking and photography has forced me to learn many techniques for hiking photography, that will help you have a better experience when you set out to capture some pictures. These tips in this post are not just for long hikes. They’re effective for all sorts of hiking photography, even when your hike is just fifty yards to the top of a little hill to capture a stunning sunset photo.
Photo Printing Tips: You Need Great Color
I shoot and deliver black and white pictures to every client, but even black and white pictures require great color, techniques, and white balance is where it all begins.
Setting a good white balance while you’re shooting is essential because skin color can trick your eyes into thinking the lighting is wrong. Did you know that areas in your picture that are too bright may appear blown-out, or clipped? It is easy to catch these areas; you’ll see them blinking on the screen, or the histogram will be smashed over to the right.
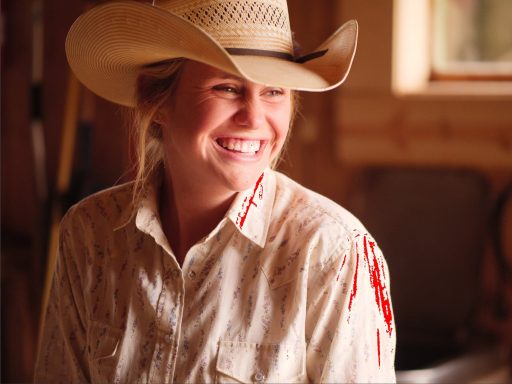
It’s not only the light that makes a photograph appear out of balance but also the color. For instance, if you photograph a person with the white balance set too warm—with too much orange—then the skin may look blown-out, but it’s not too much light that is the problem, it’s just that the reds are maxed out. Once you adjust that picture’s color temperature in post-production, you will get a better tonal range back into the skin.

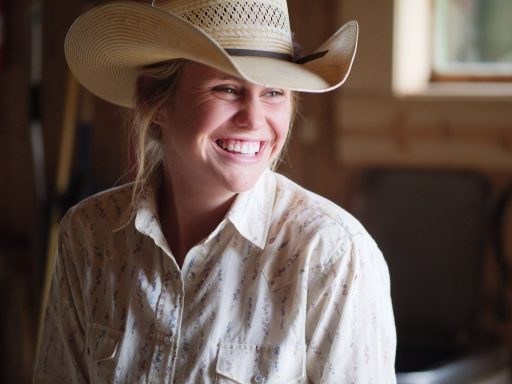
As an example, look at the photo above, the white balance set too warm, and the red areas indicate the parts that are blown-out. Simply changing the white balance removed the clipped areas, as seen in the example below. So if you shoot RAW files in your camera, you can often reclaim the white balance on the computer.

A best practice is to correct the white balance while shooting so you can more accurately gauge how your lighting is affecting the picture. Getting the right white balance from the start will show you the true tonal range of your subject’s skin. Using the camera’s built-in presets is a good idea, but for the best results, I would recommend using the custom white balance setting.
Another great tip is to photograph a white piece of paper or a white balance target under the same light as your subject. I like to use a ColorChecker Passport, but I often use a tablecloth or piece of typing paper. Use it to set the white balance on site, but also be sure to keep a photograph of the target so you can use it for tweaking the color on the computer (some cameras don’t keep a picture of the target when setting the white balance).
Make it Bright, But Not Too Bright
Photographic paper is truly amazing. I’m talking about the kind of paper your lab uses, for instance from Fujifilm and Kodak, and not the kind of “photo paper” that you buy for your inkjet printer.
Photographic paper has particles of silver embedded in the paper which allows your photographs to have the greatest tonal range in the universe. When I refer to tonal range, I mean that you could produce a picture of a black shadow that could transition from pure black to dark gray to medium gray to light gray to white, and you would be able to see a perfect gradient without any bars or banding. This means that you could produce a portrait with deep shadows on one side of the face and bright highlights on the other side and see perfect detail all the way across, and that’s amazing.
But unlike shooting with film, your camera does not have silver particles inside it. To create this wonderful gradient in print, you need to make sure to keep the tones under control while shooting. You can always add a little brightness on the computer, and you can darken things on the computer, but if you shoot it and it’s blown-out too bright or too dark, then you won’t be able to change it on the computer.

The key is to make your picture a little less dramatic while shooting, and add the drama afterward. Expose the photo so that the bright areas of the skin are not blown-out especially on dark skin, which is a common mistake. It’s okay to have dark areas but make sure that they are not clipped all the way to the left side of your histogram. This way you have detail recorded that you can alter on the computer.
Reading this, you may be thinking that you need to live by the histogram, but I really don’t want you to do that—and especially don’t worry about the shape of the histogram because it is useless.
Instead, just make sure that the important parts of your picture aren’t too bright (if a diamond ring is blown-out, it’s probably not a problem, but if the cheek is blown-out, you should adjust and shoot again).
When the important areas of a photograph aren’t blown, you can represent marvelous gradients in print that no mobile device can even come close to reproducing.
Photo Printing Tips: Conclusion
Making real photographs—printed photographs—can make a big impact on people’s lives. Holding a tangible object that is a representation of themselves has become rare and valuable, and you have the power to do it. Make sure when you shoot photos that your color setting isn’t limiting your tones, and make sure that the tones are recorded with enough information to give you limitless options for print.
Levi Sim is passionate about making photographs and helping others make their pictures better. He’s a full-time photographer that makes business portraits and markets and brands pictures for a living. He spends the rest of his time practicing all other kinds of photography.
All photos in this post are credited to Levi Sim.
Don’t forget to sign up for our newsletter so we can deliver recent blog posts, along with any TruLife product and program updates, right to your inbox.
About The Author(s)

Levi Sim
Owner/Photographer/ Public Speaker at Levi Sim Photography
Levi Sim is passionate about making photographs and helping others make their pictures better, too. He’s a full-time photographer that makes business portraits and markets and brands pictures for a living. He spends the rest of his time practicing all other kinds of photography.
