By Pamela Ann Berry
Many ask why photo printing is so important. Printing is a part of many photographers’ businesses and workflows which can always be improved. Sure, going from one screen to another is easy, but figuring out how to print at the right size and the right output can be daunting.
This blog is to help make the learning process less daunting and for photographers who do not know the basics of printing. The point of this post is to serve as a printing 101 tool. In this post, I hope to help you understand how to print and use labs more efficiently. Once you learn the art of printing, you can then sell the value of printed art to your clients.
Why photo printing?
Printing can bring another level to your photography and your client base. Prints do not require hard drives, cloud storage, or any type of device to view. A print is a tangible item that people can cherish for years. Photos are at the top of every list that people grab first when running out of the house that’s on fire. Because of this, I challenge you as a photographer to make an effort to learn how to print and to pass along the knowledge to your clients.
Why are prints suffering?
The digital age of photography, with our smartphones and social media, has caused more people to take pictures. But even though the practice of traditional photography is at an all-time high, printing remains a lost art.
A result of this is that print labs are struggling with flat sales. With the increase of people are taking pictures, you would expect the exact opposite.
Nowadays, we can see pictures online or on our phones, and it is easy to share them with a click of a button. However, it’s not the same as being able to hang a family heirloom on the wall.
Photo printing 101
Getting your prints to match what you see on your monitor is one of the biggest challenges you’ll face when dealing with printing your art. It’s a very important aspect of creating the best possible prints for you and your clients.
Many labs (and even personal printers) offer printer profiles that you can download to your computer. Once you’ve downloaded the profile, you can access it through most photo editing software.
If you are printing on your printer, you can download and use the profile your printer provides.
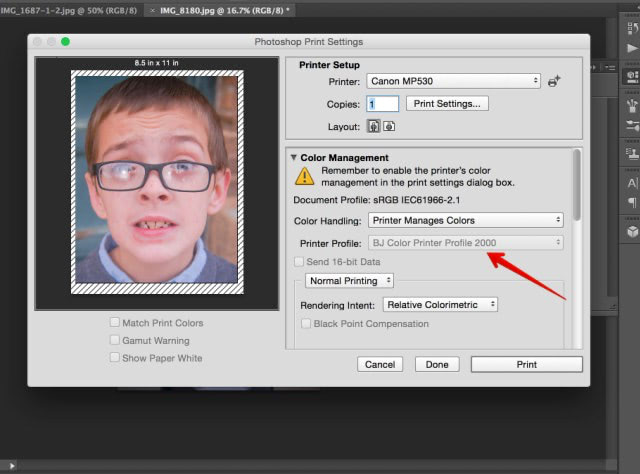
To use a profile in Photoshop:
- Choose File > Print
- From the pop-up menu at the top right of the resulting dialog box, choose Color Management. When you do, a Color Handling pop-up menu appears underneath.
- Choose Photoshop Manages Colors, and then make a selection from the Printer Profile pop-up menu. I would also advise making sure your monitor is calibrated to achieve the best possible outcome.
The lab you chose to print through will establish the color profile instructions that you will use. Each lab will have their instructions for calibrating and supplying printer profiles.
2. Understanding crop factors
I previously wrote an article about crop factors. Understanding this component happens when you are preparing the shot. This step happens before you even have your images on the computer.
When taking a photograph, you need to make sure that you are shooting with enough room, especially in group shots. Many customers want 8″ x 10″s of group photos, yet so many photographers do not allow enough room in their pictures for that format. The truth is that most photographers shoot at an aspect ratio that isn’t native for an 8″ x 10″ crop. Give yourself more room to account for different aspect ratios!
Pro tip: A family portrait needs to be bigger than an 8″ x 10″.
As an example, look at the photo above, the white balance set too warm, and the red areas indicate the parts that are blown-out. Simply changing the white balance removed the clipped areas, as seen in the example below. So if you shoot RAW files in your camera, you can often reclaim the white balance on the computer.
3. Know what sells & what looks good on walls
Knowing what sells comes with experience, but you need to learn what is going to look good on a wall. Visualize print sizes and use that to sell to your clients. I’ve never had someone tell me that they bought too big of a print, but I’ve had families admit that they wished they went with a larger size than the one they choose.
Also, many photographers do not understand that there are different types of paper out there. In my opinion, a metallic print is not something you should use to print a bride image. However, metallic is going to look amazing for a southern Utah landscape with red rocks.
Knowing the paper for your subject will allow you to impress your clients. Each lab will have a description of products; I highly recommend asking as many questions as possible. When it comes to printing, you shouldn’t be afraid to ask. Most professional labs will send you samples of their paper for you to learn and decide what you like.
The key is to make your picture a little less dramatic while shooting, and add the drama afterward. Expose the photo so that the bright areas of the skin are not blown-out especially on dark skin, which is a common mistake. It’s okay to have dark areas but make sure that they are not clipped all the way to the left side of your histogram. This way you have detail recorded that you can alter on the computer.
Reading this, you may be thinking that you need to live by the histogram, but I really don’t want you to do that—and especially don’t worry about the shape of the histogram because it is useless.
Instead, just make sure that the important parts of your picture aren’t too bright (if a diamond ring is blown-out, it’s probably not a problem, but if the cheek is blown-out, you should adjust and shoot again).
When the important areas of a photograph aren’t blown, you can represent marvelous gradients in print that no mobile device can even come close to reproducing.
The bottom line
This blog post has a lot of information to take in. But it’s worth it! Printing is such a wonderful aspect of your photography.
There’s something pretty amazing about seeing your artwork hung up. One of the best moments in life and your business is watching your clients be amazed by seeing their pictures in print.
Learn how to print and teach your clients the value of print. It’s a part of your photography business that can create a lasting impression for many years to come.
A version of this post was first published on Photofocus.
If you enjoyed this post, please sign up to receive additional information from TruLife Acrylic.
About The Author(s)

Pamela Ann Barry
Brand Experience Executive
Pamela has worked in film and radio for over 15 years. She started as a PA on major sets and eventually moved up to script supervisor. From there, the roles of producing, directing, editing, and camera operator followed. She has worked with DGA and Oscar-winning directors. Currently, her day job is as a Brand Experience Executive with a full service ad agency and production company. She is also working as a director on a documentary coming out in 2018. In college, she was recruited from her college radio station and went on to be on air talent for country, top 40, and alternative radio stations including a two-year gig as an emcee for Radio Disney.
In the past, Pamela has edited technology books on Adobe Premiere Pro, Photoshop, After Effects, Illustrator & Motion. Her main love is being behind the camera whether it’s video or photography.